
In a recent update to the OneDrive desktop sync client, Microsoft has enabled users to sync both personal and business accounts using just one app. Let’s take a look at what’s new and how it works!
Until now, Microsoft offered two distinct applications to sync files from OneDrive consumer accounts and those from the OneDrive for Business accounts. Initially they used different engines and there was little feature parity between the two clients.
In the last year, Microsoft had publically committed to unify the two clients. It started by releasing a preview version of an OneDrive for Business app that used the same engine and offered similar functionality to that of the existing OneDrive consumer sync client. But in the past few days, It seems that Microsoft has completed their work, effectively merging the two services in just one sync application.
Now, you no longer need to download a separate client for OneDrive for Business. Your existing OneDrive for consumer sync client should be updated to allow you to sign in to a business account in addition to your personal account. The one app will now handle syncing both of your accounts. Once you do so, you will have two system tray icons, one white, which shows the sync status for your consumer account, and one blue, which shows the status of your business account.
Here’s how to sign in to a business account using the OneDrive sync client
- If the desktop sync client is not running, start it by selecting it from the Start menu. (if it’s not in the Start menu, see below on installing it.
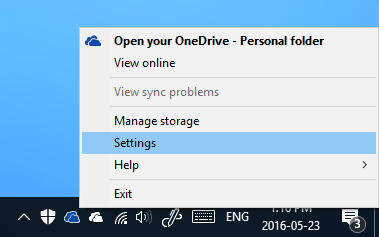
- The OneDrive icon should appear on the system tray.
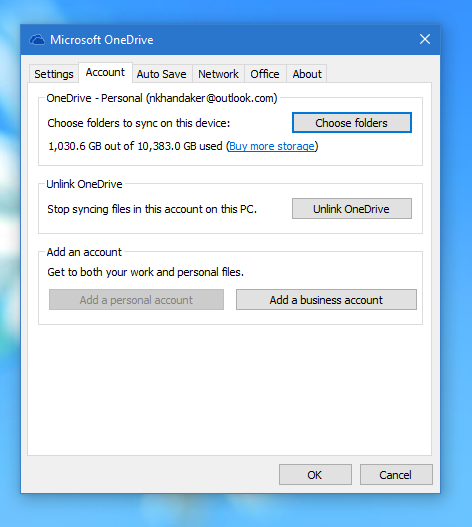
- Right-click on the OneDrive tray icon and choose “Settings”
- In the “Account” tab in the Settings dialog box, you will see the option to add a business account
Here’s how to install or update the OneDrive app
If the OneDrive sync client is not installed, you can reinstall it for Windows 7, 8.0, and 10. You can also run the OneDrive installer to manually update the OneDrive sync client to the latest version if it hasn’t yet automatically updated.

- Download the OneDrive desktop sync client from the OneDrive website. Click here to go to the download page. Note: Even though the site says you don’t need to install it for Windows 10, you can still use it to update the preinstalled client on Windows 10 or to reinstall the client if it somehow got uninstalled.
- Run the installer to install or update the sync client.
- If the app hasn’t automatically started after install, start it by selecting it from the Start menu.

