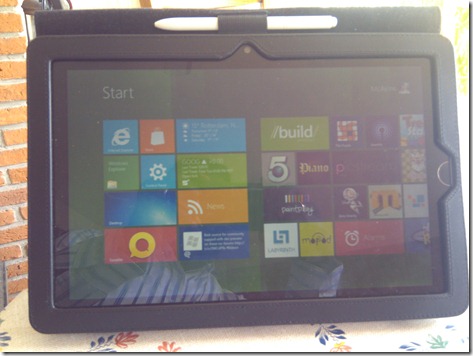
Ok guys, as you can see, my ASUS EP121 tablet is running Windows 8 without having to blow away my factory installed Windows 7 partition. I can Dual-boot to Windows 7 and Windows 8, and they are both running on a harddisk with a single partition. How do I manage this you say? I installed Windows 8 with a feature of Win7/Win8 called VHD Boot.
VHD-Boot is better than installing in a VMWare/VitualPC environments, especially now because of all the Touch features of Windows 8. If you have a touch-enabled device, you will loose the touch feature if you install in virtual environment.
VHD-Boot present you with the advantages of a virtual environment with the quality of bare-metal installation. All the standard drivers of your machine will be installed as if you are installing on the machine itself, only the installation is done in a VHD file, the same used by all virtual PC systems. This give you portability and disaster recovery possibility. I know, disaster recovery is built in Win8, but that is another subject entirely.
Another problem a lot of you are having is preparing a USB key to perform the installation. I went through the problem myself, did not succeed in copying the 64bit files to my 4Gb usb key, 54mb too short! So I resulted to preparing a Harddisk install media, yes you heard it, harddisk install media. Most of us have unused harddisks lying around with lots of space than the 4Gb required by Windows 8 to install, why not use those HDD to install?
Creating the Install Media: Be warned! These steps are only for people who know what they are doing. I am not responsible if you wipe your active boot partition accidentally!
- Find an unused HDD drive of at least 5Gb. NOTE:all data on that HDD will be wiped!
- Connect the HDD to your machine, either internally or via a SATA/IDE to Usb converter. I used a 10year old 2.5 notebook hdd I have lying around with a SATA-to-USB converter.
- Now boot up your machine to format the hdd. Note that if you are installing a 64bit of Windows 8, you will need to format the hdd on a 64bit machine. Confirm in Windows Explorer that you can see your HDD after booting into Windows.
- Start command prompt administratively by typing “CMD” in the Start Menu search box. Windows finds the command prompt. Right click on it, and select to start as administrator. Command prompt opens as admin.
- Type the following commands in red exactly pressing the enter key after the command:
- Diskpart– Diskpart, Windows hdd partitioning software opens.
- List Disk– Diskpart shows all physical harddisks on your system, including your removable HDD.
- This is the most dangerous part so be careful. Identify your HDD from its size, if it is the same size as you C: drive for example, you need to identify which one is which. Type List Volume– Diskpart shows all your volumes and their corresponding sizes. This could help you identify which drive is which. The volume number helps to identify too, but not always. Just be careful if your Install media is the same size as your boot drive! If you are not sure, contact me via Twitter for advice.
- Go back to step B, if you did step C, just to be sure you see your HDD ID. Now that you’ve identified your drive, type Select Disk #with the # corresponding to your drive ID. This command is necessary to ensure all following commands will be performed against the selected hdd.
- Now type Clean – Diskpart removes all partition information on the disk. So be careful that you’ve selected the correct disk before running this command. Now type the following commands to create your Windows 8 install drive:
- Create Part Pri – Creates primary partition on the drive
- Active – makes sure the created partition is bootable
- Format fs=FAT32 Label=”Win8 Install” Quick – formats the partition as FAT32 which is necessary to boot the install media from HDD. The Label is to help you identify the Install media after it is surfaced
- Assign – Diskpart assigns the next available letter to the drive, it is now visible in Windows Explorer with Label given in step H.
- Now you are done with preparing the HDD as install media. Mount the Windows 8 ISO with a mounting driver. I prefer to use VirtualCloneDrive from Ellaborate Bytes. Once the ISO is mounted, copy all files from the mounted drive to your prepared HDD.
- Now you can remove the install media and attach it to the device on which you want to install Windows 8, and boot it.
- To install with the VHD-Boot feature, I have found an excellent post online here. There is no point repeating the same steps here. Just go to his “Step 2 – Make a Virtual Hard Drive” and proceed from there. In this case, his “USB Key” in his “Step 1” is your HDD Install Media. Please read his cautionary statements.
All these seems complex, but it is actually simple once you get the hang of it. Writing it up makes it look weirdly. All the best installing Windows 8 on a VHD-Boot device. If you have any problem contact me via twitter: @McAkins. I will try to help as much as I can.
Happy touching Windows 8
[2012-03-06: Update to this post can be found in following![]()
https://mcakins.wordpress.com/2012/03/06/installing-windows-8-on-bare-metal-with-vhd-bootthe-update/


